Fallout 4: Far Harbor – A Complete Guide To Best Left Forgotten

A lot of quests in Fallout 4 are usually straightforward slugfests or consequence branches. Then the Far Harbor DLC came along and wracked everyone’s mind when it came to one quest in the main storyline called “Best Left Forgotten.” That’s because it features some of the hardest and most complex in-game series of puzzles that players have to solve to progress.
Hence, there’s no shame in looking for guides in order to push through such an ordeal. The rest of the quest is pretty scripted and easy enough so the guide will mostly tackle how to solve the said puzzles along with some helpful tips to avoid tedium or frustration.
11 INTO THE NUCLEUS

By far the easiest part of the quest, simply follow the map markers and instructions and go deep into the submarine, The Nucleus. Be sure to pack in some heat or some hacking smarts as there are plenty of robots, computers, and traps waiting to kill cheeky intruders.
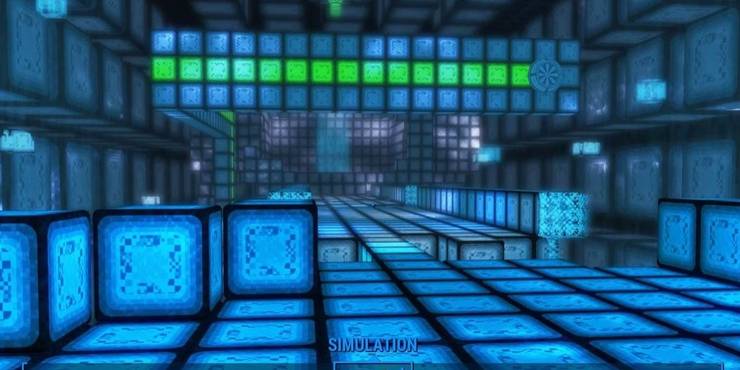
Once power has been restored and Faraday’s program is accessible, players will enter a virtual reality representation of a computer program where they must solve programming error puzzles in order to retrieve DiMA’s memories.
10 DiMA’S MEMORIES, MEMORY 1

The setup of this first puzzle simple enough. It’s solved once the players have cleared a path for the little green bugs straight into the yellow data stream and then they should be able to return to the blue data stream to deposit the memory they obtained. Make a path for the green bugs by removing one of lighter Code Blocks in the starting area to form a bridge for them.
The next obstacle is the firewall. To deactivate this one, just remove a Code Block that blocks the green Decoder Beam from hitting the firewall. The green bugs will also need another bridge after this obstacle. Just grab one of the Code Blocks and build them one.
9 MEMORY 1 CONTINUED

Now for the next obstacle, another firewall. All it needs to be deactivated is another green Decoder Beam which is present nearby but is being redirected by a Code Block. Rotate that Code Block so that its green face is pointing at the firewall, redirecting the Decoder Beam.
Once your green indexer bugs have reached the data stream, the program will deploy some sentries to destroy them. Protect the indexer bugs by using the five turrets given by the program and placing them in strategic locations on the map. Once the indexer bugs have successfully transferred the information, simply jump into the formerly yellow data stream which is now blue to continue to Memory 2.
8 DiMA’S MEMORIES, MEMORY 2

On to the next memory. Look below and find the Decoder Beam that’s being blocked by a Code Block and remove that blocker. Afterward, follow the Decoder Beam and remove and store any Code Block that’s blocking it. Players will eventually come by a Decoder Relay Block that needs to be rotated to redirect the Decoder Beam to a removable Code Block. Remove that Code Block to make a window for the beam.
This will destroy the first firewall of the puzzle. Soon after that, there is another one. Players will have to stack up some Code Blocks and place a Decoder Relay Block at the top to catch the Decoder Beam and then rotate it to redirect it to the firewall.
7 MEMORY 2 CONTINUED

Once the big firewall is gone, players will just have to build a bridge for the green indexer bugs to get through to the yellow data stream. As before, once the first green bug touches the data stream, the Sentries will start being hostile to them.
Thankfully, there are turrets here as well and players just have to place them in locations that protect the indexer bugs on their way back to the blue data stream. Once done, jump into the previously yellow data stream that’s now blue for Memory 3.
6 DiMA’S MEMORIES, MEMORY 3

For Memory 3, look for the Code Block wall near the starting area and tear it down to build a bridge for the indexer bugs. There will then be an area with two firewalls left and right. Climb the stack of blocks near the firewall on the left side and look jump into a small chamber above the firewall. There will be a Decoder Relay Block there and several Code Blocks. Take them all and jump back down.
Once down, build another pillar with the topmost portion being the Decoder Relay Block to catch the Decoder beam and direct it at the left firewall. Once the left firewall is gone, there will new Code Blocks available along with some Decoder Relay Blocks. Grab them all and then move that pillar you made two spaces back so it can hit the static Decoder Relay Block in the wall to dissipate the firewall on the right side.
5 MEMORY 3 CONTINUED

After that, build a bridge for the green indexer bugs. Once they’re through, the next area will feature a big firewall again. Look to the right side of the firewall and carefully jump at the blocks all the way to the top to reveal the firewall’s weak spot. Build another pillar and place the Decoder Relay Block to redirect the Decoder Beam to the firewall.
Jump down after that and build a bridge for the indexer bugs. After that’s it’s the standard reverse tower-defense mode again where the bugs have to be defended while transferring the memories between the data streams. Jump into the blue stream again for Memory 4. Only three memories are necessary for quest progression but players can go the extra mile (Memories 4 and 5) for bonus rewards and exposition.
4 DiMA’S MEMORIES, MEMORY 4

Memory 4 is more complex than the first three. In the starting area, climb the platform and look for the alcove on the right with the pile of Code Blcoks and a Decoder Relay Block. Use those to build a pillar with the Decoder Relay Block at the top to redirect the Decoder Stream to the firewall on the left side. Once that’s gone, grab the additional blocks in the left alcove.
Now on to the bigger firewall. Build two angled pillars that direct the Decoder Beam to the weak spot on the right side of the firewall using the Decoder Relay Blocks to control the Decoder. Note that any block can be attached to any side without the risk of falling off due to gravity.
3 MEMORY 4 CONTINUED
Make sure to collect back all the blocks once the firewalls are gone. Build a bridge for the indexer bugs and then once they’re across, follow the green block line and jump down to see its Decoder Relay Block end. This is the key to removing the final firewall. Look for the Decoder Beam coming from the top and place a Decoder Relay Block to redirect it to the green relay line. This will dissipate the final firewall.
After that, it’s back to the usual turret vs. Sentry game again where the indexer bugs have to be protected. An additional quest dialogue will be unlocked after this as well as Memory 5.
2 DiMA’S MEMORIES, MEMORY 5

Finally, Memory 5. Start by grabbing all the available Code Blocks and then building a bridge toward an island with the Decoder Beam pyramid structure on it. Get to the pyramid and grab all the available blocks, including the Decoder Relay Block but take note of where it’s redirecting the Decoder Beam. Then, build a pillar two blocks high and place the Decoder Relay Block there but this time redirecting the Decoder Beam at the other direction it was originally directing the beam at.
This should dissipate a firewall. Build a bridge to that island with the four pillars, grab all available blocks there and then build a bridge to another nearby island and grab all the blocks there. Then go back to the island with four pillars and build a vertical pillar that redirects the Decoder Beam to the firewall nearby. Build a bridge to that unlocked island, grab the Decoder Relay Block and then build another pillar the redirects the Decoder Beam to the right, to another island where the beam is blocked by a removable Code Block.
1 MEMORY 5 CONTINUED

Once that’s done, make your way back to the center island with the pyramid and build a bridge toward the island where the Decoder Beam is going. Remove all the Code Blocks blocking that Decoder Beam until it’s hitting the green relay wall block. Then go back to the island with the block pyramid and then back to the Blue Data Stream starting point. Then build a bridge to the left and grab all the blocks you can, then go to the very top of all the static blocks, grabbing any Decoder Relay Block visible. After that, head for where the Decoder Beam is going, remove all the blocks blocking its way, and redirect it toward the firewall weak spot (the one nearest).
Grab the Decoder Relay Block used on the last firewall once that’s done and redirect the Decoder Beam near the Blue Data Stream starting point by building bridges towards the beams and then redirecting the beams with the Decoder Relay Blocks. Once you’ve managed to make the Decoder Beam go between the final firewall and the Blue Data Stream, then simply build two-block pillars, top it with a Decoder Relay Block, and then redirect the beam at the firewall. After that, it’s all a matter of protecting the indexing bugs and reaping the rewards.
About The Author
Best Posts


Related Posts

Halloween Kills Theory: Laurie Strode’s Daughter Won’t Survive
Halloween 2018 introduced both Laurie Strode's daughter Karen and granddaughter Allyson, but we think the former won't survive Halloween Kills.
Terminator 2: The Deleted T-1000 Subplot That Explains His Defeat
For most of Terminator 2: Judgment Day, the T-1000 is portrayed as nearly invincible, but a deleted subplot explains why he ultimately lost.

The Society: 10 Best Quotes
Netflix recently canceled The Society after only one season but the show will likely live on thanks to these 10 unforgettable quotes.

Endgame BTS Photo Shows Tony & Pepper In Hospital After Iron Man’s Rescue
Gwyneth Paltrow shares a new Avengers: Endgame behind-the-scenes image of Tony Stark and Pepper Potts after Iron Man was rescued from space.

X-Men’s Magik Could Be Marvel’s Most Powerful Mutant Ever
The X-Men include some of the most powerful mutants imaginable - but Magik could easily be the most formidable one of them all.

AC Valhalla Post-Launch Content Will Be “Stronger” Than Odyssey’s
In its most recent earnings call, Ubisoft noted Assassin's Creed Valhalla will benefit from "stronger" post-launch support compared to AC Odyssey.

You Season 3’s Ending Ruined The Perfect Season 4 Set-Up
Netflix's You season 3 ends with an unexpected twist that ruins what could have been the perfect set-up for the hit series' next installment.

Professor X’s Mutant Dream Finally Comes True in a Way He Never Imagined
A preview for X-Men Red #6 shows how the planet Arakko has achieved Xavier's failed dream of mutant-human coexistence, as they look beyond difference.